Thursday, September 8, 2011

For the Kids Friday #27


Short and sweet this week....
I'm so happy you here!
Thanks for making this link party a great resource each and every week.
Check out my favorites from last week's party below....


BTW... I add all of these features to the A++ tab above, for a collection of features shared at the weekly parties.  I also select links to share at the Sun Scholars Facebook Page each week.  Come "LIKE" SunScholars on Facebook.  See what I'm pinning on Pinterest.  Subscribe to my e-mail updates on the sidebar!!!

Featured below?
If so... grab this button to share on your blog!


Sun Scholars


Collection of 30 Boy Crafts
at Red Ted Art

Cereal (Grain) Matching Activity
at In the Pursuit of E.

Stamped Washer Name Tag & Necklace
at Fancy Frugal Life

  
Book Bingo (Reading Reward System)
at Let Kids Create

 
The Kissing Hand Activities
at Mom to 2 Posh Lil Divas

A Gross Halloween Treat
at Hungry Happenings

Photobucket
Can't Sleep Without Sheep Craft
at Little Wonders' Days

Donut Holes (made from mini muffins)
at Loving Life One Meal at a Time


Onto the Party....


This Week\


1)  I would LOVE for you to first be a follower of my blog.  (And why wouldn't you want to be?!)

2)  Grab my For the Kids Fridays Button and place it somewhere on your blog.  Be sure to link back to me!

3)  Link up as many KID-RELATED activities, games, recipes, parties, gifts, clothing you've created, crafts, traditions, lessons, and so on... that you would like to share.  Please add a different link each week.  They can be old or new... this is just a place to share ideas for our kids to enjoy.  Bonus points to those that serve some educational purpose too!  Link must be to the specific post, and not your general blog page.  Please don't link to your store.

4)  Share the love and comment on at least one other link.  Everyone loves to get feedback.


That's it!  Have fun, and thanks so much for participating!


Tuesday, September 6, 2011

Sea Turtle Craft

Today I am featuring another Rachel from I Heart Crafty Things.  Where do I start?!  Rachel's blog is filled with fabulous stories with snacks and activities to go along with them.  Not only is she sharing the joy of reading with her kids, but she is making it fun and educational too!  Her blog is an amazing resource for parents, teachers and caregivers of younger children.  Please take a moment to see what Rachel has been doing over at her blog.

Some of my personal favorites over at
I Heart Crafty Things...


1) A House for Hermit Crab (Eric Carl)    2) Mr. Shark Alphabet Chomper Game
3) Monster Pillows   4) Chicka Chicka Boom Boom Story Time


~*~*~*~*~*~*~*~*~*~*~*~*~*~*~*~*~*~*~*~*~*~*~*~*~*~

I HEART CRAFTY THINGS

Hi, I'm Rachel over at I Heart Crafty Things. I am HUGE fan of Sun Scholars so I am beyond excited to be here today!  I developed a passion for children's art when my oldest child became a toddler and ever since then we've been crafting like crazy at our house. We love combining our projects with books and also enjoy doing crafts based on activities that we do as a family. We recently took a trip to our local Aquarium and ever since then we've enjoyed doing some super cool ocean-themed crafts around our house.

We decided that before we end our ocean-themed unit we wanted to be sure to make one of our most favorite creatures of the sea, the Sea Turtle.


My 4yr old is pretty proud of his little guy, and he makes sure that when he is pretend playing with him that he has a surfer dude accent when he talks just like on "Finding Nemo".  Haha! Want to know how to make this adorable sea turtle?


Materials you will need:
-Template found HERE
-small paper bowl
-small paper plate
-green paint
-paint brush
-green and brown paper
-scissors
-glue
-stapler
-black marker
-wiggly eyes

Directions:
1. Turn your small paper bowl upside down and paint the entire bottom of it with green paint. Let it dry completely.

2. While your paint is drying, print out the template I made, found HERE. You can either print it out on green card stock paper, or you can print it out on white card stock paper and have your child color it green.

3. Have your child cut out all the pieces on the template. Some of the pieces are a little tricky, but that makes it excellent practice for a preschooler.

4. Cut out several small squares out of your brown and green paper. We used card stock because it was what I had on hand, but it probably would work better with just plain paper that isn't so thick. You will see why in a minute.

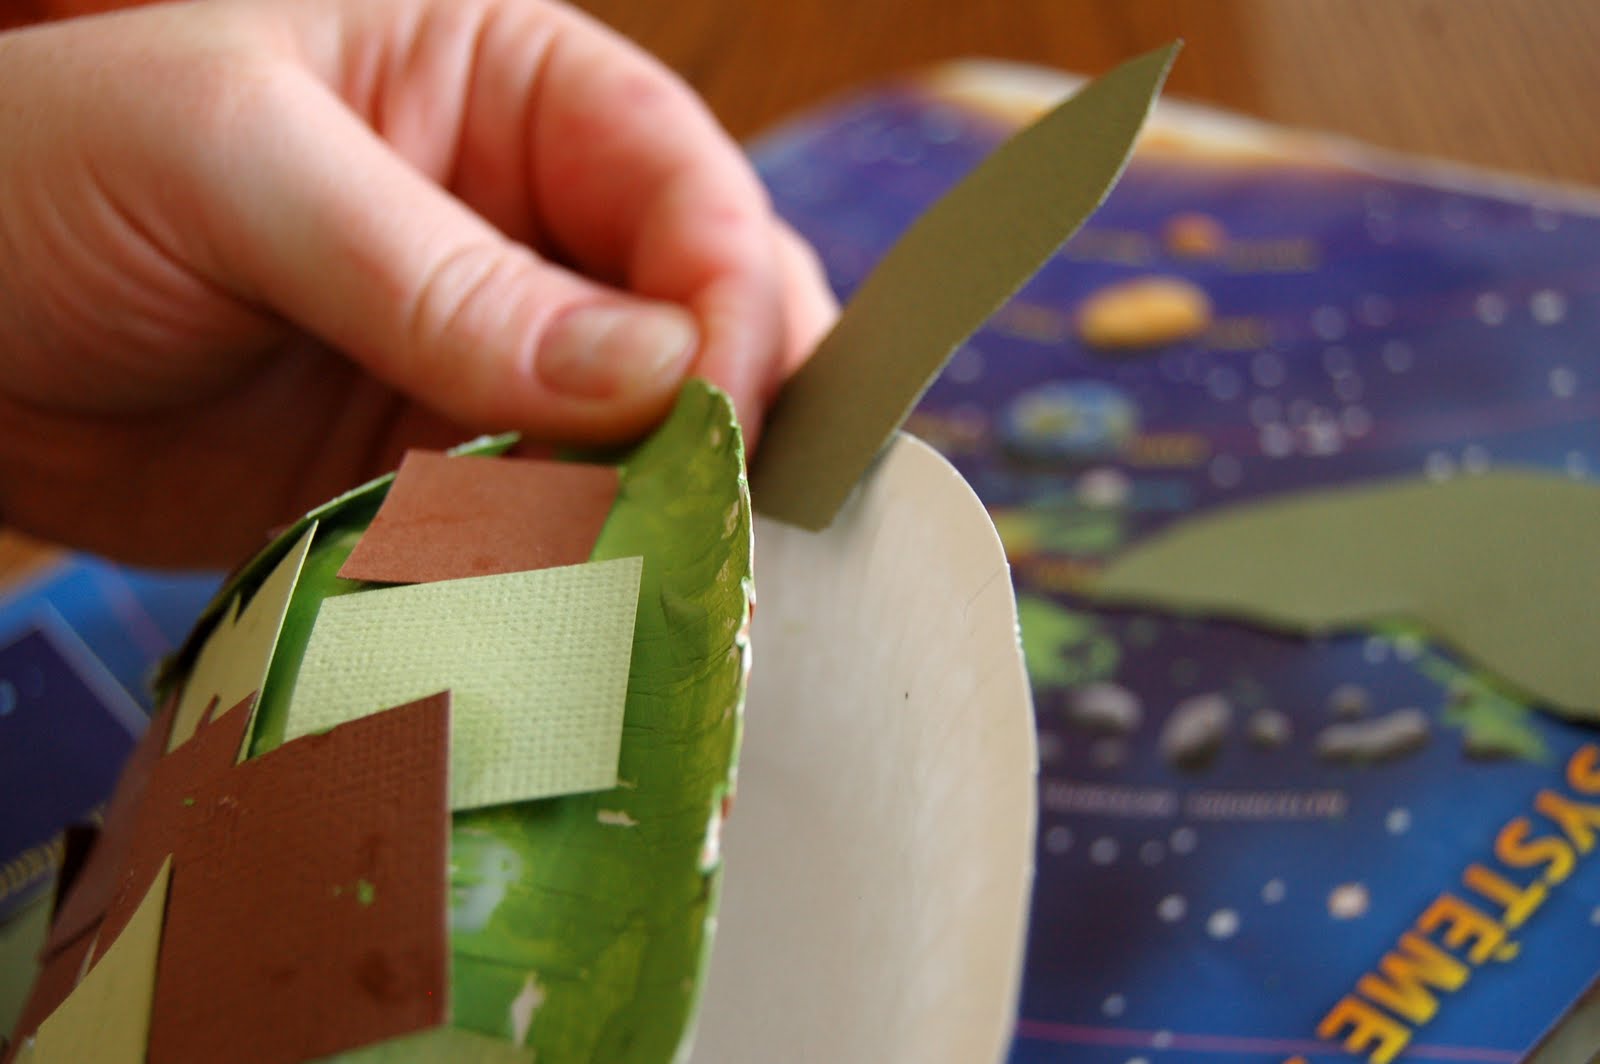
5. At this point, our paper bowl was dry, or close enough that we could move on to the next step. Spread glue all over the paper bowl and place your small squares all over to make the turtle's shell. Let it dry.

You can see how it would have worked a little better using paper that wasn't so thick, but since we like to use what we have on hand when we can, the card stock managed just fine.

6. Now it is time to assemble the sea turtle together. We will be sandwiching the turtle shell, the turtle pieces and the small paper plate together, just like in the picture below, and then stapling it shut.


I started with the head, then added each arm, and then the two legs. I knew glue wouldn't hold up very well so stapling is really the best option.

7. At this point Luke said, "All he needs now is some of those googly eye things." So true! We glued on some eyes and used our black marker to add two small dots for his nose.

Now step back, take a look and say "Whoa, dude...That is one awesome sea turtle!"  :)

Happy Crafting!!
Make sure you stop by I Heart Crafty Things to say hello!

Sunday, September 4, 2011

Vowel Headbands

Today I am featuring J from Relentlessly Fun, Deceptively Educational.  Let me tell you... if you are ever on the hunt for fun, educational games and activities for your little ones, you MUST stop by her blog.  She has a wealth of ideas that you and your kids will love.  I always look forward to the ideas she shares at For the Kids Fridays, and I am thrilled to have her here sharing with us today.

Some of my personal favorites over at
Relentlessly Fun, Deceptively Educational...


1) Friend Vs. Foe (Beetle Tic-Tac-Toe)
2) 10-Pin Addition      3) Glow-in-the-Dark Addition)     4) Brown Bag Game


~*~*~*~*~*~*~*~*~*~*~*~*~*~*~*~*~*~*~*~*~*~*~*~*~*~


Hi, I'm J from Relentlessly Fun, Deceptively Educational, a blog I created to share sneaky activities for supplemental learning. The activities I do with my 6-year-old son after school are inspired by the questions he asks, challenges he faces, and his never-ending curiosity. I hope you'll stop by sometime to see all the fun we're having (and all the things my son is learning)! I'm thrilled to share this idea on the Sun Scholars blog, one of my favorite resources for fun kid-inspired ideas on the Internet. Thanks Rachel, for the opportunity to guest post!


A few weekends ago, several families met friends at a lake for the weekend. One of the moms brought the game Headbandz
for Kids
, which the tween girls had a blast with. Watching them play was a
real inspiration.

I’ve been looking for a clever way to help my son practice
vowels. The headbands were it!

For this activity you need three main supplies: cardstock, five
square post-it notes, and five index cards (or cut up cardstock). You’ll also need a stapler and
black marker.

Write each of the vowels (a, e, i, o, u) on a post-it note;
make sure the sticky part of the note is on the bottom. Stick these to the
index cards.

Cut the card stock into strips (between an inch and 1 1/2-inches
wide). Staple the strips of paper together to make a headband the size of your
child’s head.

If your child does not know the vowels from memory, print
them on a piece of paper so they can refer to it as they play.

Next hold the vowel cards and ask your child to select one
without looking.

Peel off the sticky note and tack it to their headband.
Provide clues like the sounds the vowels make (depending on your child’s
knowledge of phonics, the short vowel sounds will be more challenging). Also say several words with the vowels in them. 

If your child is like mine, you can literally tell when the light bulb goes on. My son practically lit up when he'd figured out which vowel was on his headband. After each guess, I had him remove his headband to check his answer.


If through process of elimination your child guesses the
last vowel, ask them to tell you what
sounds that letter makes and what words it’s in.

This headband activity would be great to practice phonics
too. Because sometimes the best way to get letters engrained in your child’s
head, is to put them on their head.http://deceptivelyeducational.blogspot.com/2011/07/friend-vs-foe-beetle-tic-tac-toe.html

Thursday, September 1, 2011

For the Kids Friday #26


First of all... did you catch my round-up of Parenting Tips, Tricks and Inspirations??  If not, don't miss it.  I have found some great ideas around blogland that I'm sure you'll love.  Find it HERE.

Other news... I have taken a part-time teaching position at the international school where my children are enrolled.  So my time will be stretched a bit.  I will be keeping up with my blog as much as possible, but there may be some weeks were the only post will be the For the Kids Link Party...

Sorry to keep it brief, but you aren't here to read about me, right?  You're here to share and find awesome ideas... including these awesome features from last week!  Oh my gosh, I had SUCH a hard time narrowing it down this week.  Last week was CRAM-PACKED with awesome links!!

BTW... I add all of these features to the A++ tab above, for a collection of features shared at the weekly parties.  I also select links to share at the Sun Scholars Facebook Page each week.  Come "LIKE" SunScholars on Facebook.  See what I'm pinning on Pinterest.  Subscribe to my e-mail updates on the sidebar!!!

Featured below?
If so... grab this button to share on your blog!


Sun Scholars


at The Iowa Farmer's Wife

pencil 1
at Crafty Staci

at I Heart Crafty Things

Photobucket
at Little Wonders' Days

at Giggles Galore

at Mud Pie Makers

at Relentlessly Fun, Deceptively Educational

at Taidye Original


Onto the Party....


This Week\


1)  I would LOVE for you to first be a follower of my blog.  (And why wouldn't you want to be?!)

2)  Grab my For the Kids Fridays Button and place it somewhere on your blog.  Be sure to link back to me!

3)  Link up as many KID-RELATED activities, games, recipes, parties, gifts, clothing you've created, crafts, traditions, lessons, and so on... that you would like to share.  Please add a different link each week.  They can be old or new... this is just a place to share ideas for our kids to enjoy.  Bonus points to those that serve some educational purpose too!  Link must be to the specific post, and not your general blog page.  Please don't link to your store.

4)  Share the love and comment on at least one other link.  Everyone loves to get feedback.


That's it!  Have fun, and thanks so much for participating!


What's in Your Apothecary?


Today I am featuring a great little blog called Uncommon which is shared by Trish and Bonnie.  Their blog is filled with lots of fabulous home and holiday inspired crafts.  It is a great place for ideas!  I have asked them to share one of their favorite blog posts with all of you here at Sun Scholars today.  PLEASE hop on over to their blog and see what other great things they are sharing!


Some of my favorite posts shared at Uncommon...


1) Back-to-School Ice Cream Social
2) Love is a verb... teaching your children about love
3) Decorative Fabric Pumpkins


~*~*~*~*~*~*~*~*~*~*~*~*~*~*~*~*~*~*~*~*~*~*~*~*~

My Photo
Hey Sun Scholar readers!

We are Trish and Bonnie from UNCOMMON and we are thrilled to be here today at Sun Scholars with a guest post!!
                                           
Have You Seen These...

How About These...

Bonnie and I were looking back over the past year (now that our lovely, beautiful, sweet children are back in school!) and by far these two projects have had the most interest on our little blog, Uncommon!

It never fails, each week these continue to rank very high in our stats. Of course with the beginning Pinterest , well, let's just say we have been shocked by the numbers!

They were based on a tutorial found at Shanty 2 Chic.  Bonnie and I loved the look of them and knew we had to make them for ourselves. We followed their tutorial, but we did add an extra piece of wood under the glass jars to give it some extra visual weight and stability. Another little extra was spraying each with a semi-gloss poly to give it a very finished look!

These are so cute and offer you LOTS  of decorating flexibility. Our children LOVE to see what we will fill them with next!!
  
How about you? What would you fill them with?
Hop on over to UNCOMMON and look around, we would love to have you visit and stay for a while! Meanwhile, keep an eye out for what we will be doing with these for the fall!
It's going to be super cute!