Thursday, May 26, 2011

For the Kids Friday #12


YEAH!!!  Time for another kid-friendly link party!

I have one child now finished with school for the year, and the other two will be finished a week from today.  I can't wait to try some of these fabulous ideas with my kids over the summer months.  Thanks again for all of you who join in each week to make this a great resource for everyone!  You guys ROCK!

And of course, I have to share some of my favorites from last week's party.  Stop by and check out these amazing posts!  There are some great ideas for the summer months.  All of these will be added to my A++ Features, found on the tab above.

Featured below?
If so... grab this button to share on your blog!


Sun Scholars


at 2 Little Hooligans

at 2 Little Hooligans

Photobucket
at Little Wonders' Days

at Kitchen Fun with My Three Sons

at A Pretty Life in the Suburbs

at The Moffatt Girls

at Strong Start


Ok... let's party!


Sun Scholars


1)  I would LOVE for you to first be a follower of my blog.  (And why wouldn't you want to be?!)

2)  Grab my For the Kids Fridays Button and place it somewhere on your blog.  Be sure to link back to me!

3)  Link up as many KID-RELATED activities, games, recipes, parties, gifts, clothing you've created, crafts, traditions, lessons, and so on... that you would like to share.  Please add a different link each week.  They can be old or new... this is just a place to share ideas for our kids to enjoy.  Bonus points to those that serve some educational purpose too!  Link must be to the specific post, and not your general blog page.  Please don't link to your store.

4)  Share the love and comment on at least one other link.  Everyone loves to get feedback.


That's it!  Have fun, and thanks so much for participating!


Tuesday, May 24, 2011

Bandanna Skirt

Don't you just LOVE her style?
Yeah, this little diva has a fashion sense of her own!  Can't say she got it from me.  I think I'm pretty boring in the fashion department.  I do, however, buy her clothes, so I guess I am somewhat to blame.

Ignore the mismatched outfit... did you see her cute little skirt?
I made that for less than $3, using two bandannas!

This was my inspiration...
at Tidbits

I saw this post, and thought it was just too cute.  So I had to make my own.

I made a couple of changes, finding part of her instructions to be more work then you needed to go to.  That is why I'm adding my own instructions here.
However, please do refer to her tutorial for the full instructions (even though I made some changes, her tutorial really is great).


Materials Needed:
- 2 Bandannas
- Lycra Fabric (a strip about 40" x 6" for your waistband)
- Thread

Directions:
1)  Fold each bandanna in half, then half again, so it looks like this...

See how I've measured the "middle" corner down about 2 1/2"?  I made my cut there...


When I opened it up, it looked like this.  I then made one cut above my ruler as it rests in the photo above.

2)  Now this part is tricky to describe... In the image above you see that you have four, straight lines in the center of the bandanna making a square, right?  Well, you are going to fold the bandanna so that these edges of the bandanna lay in a straight line for the top of your skirt.

Here I am beginning to fold, by pinching the fold on the bandanna at one corner of the inside square.


As I am pulling that fold up, notice that the lines now above are straight (rather than a 90 degree angle)?  And below, you notice two points.  Do the same with the two other "folds".


And with all four folds laying properly, you will have this.  I put a few pins in each fold to keep everything in place.  I'd even recommend using the iron to give it a nice press to it here too.
Now here is one change I made to the original.
I chose to have the "folds" showing, or on the outside, of my skirt.
If you turn this over, you see this...

I debated.  Did I want to make this the skirt, or the other, with the folds?
I decided to go with the folded side this time.

Decide which you like best, and go with it... the rest of the directions work for either version.

Now follow the same instructions to fold your second bandanna!


3) Lay your bandannas, right-sides together, and pin the sides along your cut edges at the side.
   

Sew your bandanna's together where you have pinned.

Turn your skirt right-side out and press your new seams at the fold...

Then, using the same technique above, fold your new folds in line with the others on your skirt, and pin.


4) Now your skirt is ready for your waistband to be added.  I'm going to direct you to Cami's directions from here, because I wouldn't change a thing from here on out!  I opted to add elastic to my waistband, but think her version is much nicer.


Another note I'll add, this skirt was a good length for my 4 year old.  I made a second skirt for my 7 year old, and it is a little short.  She just adds leggings underneath.  One thought would be to sew the flap seams down, or add a longer waistband.


Thanks for a great tutorial and a super cute idea Cami!
Hope you all enjoy it!

Sunday, May 22, 2011

Summer Checklist (for Teacher)


Tell me this isn't a great gift for any child's teacher!
A Summer Checklist, created by your child, with a pen so your child's teacher can be ready to cross off the items on the list.  What I love most about this, is that my children made it.  They came up with the ideas for the checklist on their own.  They chose the stickers they wanted to decorate it with.  They did (or tried to do most of) the writing.

Ready to make your own?
This is how we did it...

Supplies Needed:
Picture Frame, Paper, Summer Themed Stickers, Markers

Not Pictured:
Ribbon, Hot Glue, Dry Erase Pen


Directions:
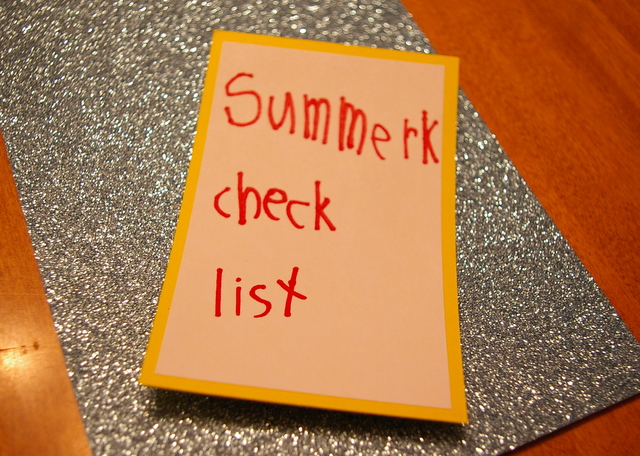
1)  We chose to use a two picture frame so we could separate our title from the checklist.  I found some great sparkle scrapbook paper and some yellow card stock.  I cut squares for each side of the frame.  My children wrote "Summer Checklist" on one side.


Yeah, well... let me tell you.
This was my kindergartener.  I was dictating the spelling to him, and said "K, space and check.... c, h..." 'K' as in, "OK, we are finished with the word summer, so we are moving onto the next."  You get it, right?  Well, I couldn't understand for the life of my where he came up with the "k" at the end of summer.  That is, not until I said 'K' after he finished helping him to spell "check" and heard myself again say, "K, next word..."

Secondly.... so I'm thinking 'Checklist' should be one word, not two.
That, I learned from my 2nd grader.  Spelling was never my thing.. ha ha.  Now you know!


2)  Decorate with stickers!
So the extra 'K' was easily hidden with some strategically placed stickers.  No biggy!


3)  Ask your child to create a list of all the things they thing their teacher should do to make the best of their summer vacation.  It is really funny to see what they come up with (especially the littlest ones).

Wesley got tired of writing, so he asked me to do the rest of the writing as he came up with ideas.


4)  Place your title and checklist in your frame.


Here are a few of our finished lists...
Tatum (3) on the left, Wesley (6) on the right, and Charlotte (7) below


5)  Attach a dry-erase pen!
I chose to hot glue a ribbon to the frame that would tie to hold the marker.  You could also glue a loop of fabric or ribbon to the side of the frame as a sleeve for the pen to rest in.
  

Make sure you attach a note to explain the purpose of your gift!
Let me add, your teacher will be using the dry-erase pen on the glass, so they will not need to spoil your child's work.  The glass can be cleaned if they every choose to re-use the frame.

I can't wait to share these with the teachers.  We have one more great gift for our teachers we are still working on.  Stop by soon to see what we're doing next!


linking up at Today's Creative Blog, and many of THESE other great link parties.

Summer Scholar Sunday #3


Each week, I will feature an activity found in the Sun Scholars Summer Program and share some highlights from our Summer Scholar Families.  We'd love to have you follow along.  If you like what you see, and would like to learn more about my Sun Scholar Summer Program, click HERE.


Miniature Terrarium
Subjects:    Science
Time:         10+ mins
Supplies:       Small Jar, a variety of natural items, such as moss, pine cones, tree bark, seed pods, etc.

this is from Week 5 - The Great Outdoors of the Sun Scholar Summer Program


Have your child create their own miniature terrarium with items they collect on a nature hike.  Take some time to explore the outdoors for items they can include in this project.


Creating a Miniature Terrarium
·         Clean and dry your jar and lid.
·         Spread out your collected items on the table in front of you.
·         Place the moss in the lid.
·         Have your child select other collected items and arrange them on top of the moss.  You can “burry” the roots of small plants and flowers in the moss to encourage them to grow.
·         Dampen the arrangement by sprinkling or spraying with water.
·         Gently place the jar over top of the arrangement and screw into place.
·         Find a safe place to keep your terrarium for all to enjoy.


Note:  I found these great little jars (in the photos) at Michael's for $1 a piece.  I thought they added some nice character, but you could just as easily grab something from your recycling bucket.


We didn't find any brightly colored berries to throw in this time, but the kids really enjoyed this project.  From our picnic, nature hunt at the park, to the building of their terrariums.  A great project for the kids!


What have the Summer Scholar Families been up to?


Amy
This week our family chose Week 3 - Animal Fun. The activities we did were:
Story Time
Learning About Animals
Newspaper Math
Movie Party Planning
Movie Invitations
Movie Snacks
Movie Review
Lost Pet Poster
Learning About More Animals
Birdwatching

 
For Story Time, the kids chose books about wolves and mammals. We also got a bird watching book to identify the birds in our backyard. The kids enjoyed learning new facts about their favorite animals and creating their animal fact sheets afterward. We had a very stormy, rainy week, so we didn't see many birds. We'll continue this next week with nicer weather.


We had a great time with the newspaper math. It was fun to see what kind of menus my kids would put together. It was also good for my older kids to see how much a meal can cost. The younger boys enjoyed trying to find the numbers in the paper.

Our family LOVES movie parties, so we had a great time planning our animal themed one. We decided to watch Bolt. We did animal themed
snacks: Puppy Chow, Gummy Bears, Swedish Fish, Pigeon Feed (popcorn), etc. They made puppy beds on the floor and convinced me to serve their drinks in bowls so they could lick it up like puppies.


We had a great time with animal week! There were so many activities in this week that we weren't able to squeeze in, so we will have another animal themed week soon.

Many friends and family have asked how the Sun Scholar program has been going. So far, we all love it. My kids are still in school right now, but as soon as I pick them up, they ask what Sun Scholar activities they get to do today. In fact, it has been hard to get them to do their regular homework first. We have all loved the activities so far and can't wait to enjoy the rest of the them. 


Melissa
Mailmania was our topic this week:

Address book:  The first assignment the kids completed was adding another "person" to their address book.  Zachary added his "Bubby", aka grandma.  One thing that surprised me was that he never knew her "real name"....lol...we then added a picture to it and put it into his address book!  We talked how important it was to have all the correct spelling and zip codes on the address so that the mail would get to her.

Mail Sorting: on Monday, we received quite a lot of mail from all around the US, which worked out great for our 1st assignment this week!  1 First I laid all the mail out on the table and read to them the states they came from (Printed out the map of the US that is provided with the program). Then the children found that state and marked it with an X.  After going through all the mail I asked a few questions:  What piece of mail came the furthest?  Closest?  Any of the mail come from states that border us?  We had 1 piece from CA and several others from out in the west (we are east coast).   

   
Graphing our mail - I printed out the graphing sheet provided and the kids graphed the TYPE of mail that was received.  Magazines, junk mail, bills, notes & cards etc.  This was fun for them to see how much JUNK we get...lol...

BONUS IDEA: I had for my preschooler was to take the envelopes (we had all sizes) and put them into order according to their size.  She had fun with this one!

  
- after a quick lesson on what stamps are, what they mean and how they are used, the children made their own stamps. (We did not use the printable sheet provided as I was out of ink that day in the printer so we made our own).  Molly made a flower and put $ 10 as the postage!  Zachary made a Lego Man (of course) and put $ .20 on his...lol....they were very proud of them!

They loved this unit and I can see spending another week on it for sure!


Heather
The kids favorite activity this week was the ABC Scavenger Hunt

Our daughter loved finding all the letters of the alphabet on the back of cereal boxes. When she was done, she had moved on to cracker boxes. When I poured the cereal this morning, she asked if she could try finding the letters on the milk carton. 


Just as we had sat down to work on this activity, a neighborhood friend knocked on the door to see if our son could play. Instead of canceling the activity, I sent our son and his friend on the scavenger hunt around our block, to find objects, signs and words starting with each letter of the alphabet. They not only played together, but learned together, and had a great time creatively finding ways to fill in Q and Z.

I am continually amazed at the versatility of this program. The age of the child does not matter. The activities have been so well chosen and thought out, that they can (with little stress and effort on my part) be adapted to children of all ages.

The activity this week also reemphasized to our children that learning is everywhere, in everything. And that learning is fun. 


Emily
This has been a crazy week and I'm so thankful for the Sun Scholar Summer Program.  I had sick kids this week, it was so nice to pull out an activity for the kids and have it be worth the extra effort.  Our activities were from week 3, Animal Fun.

Learning about Animals.  I'm glad that I had reserved a bunch of books about animals last week.  We sick littles, they loved cuddling on the couch reading about different animals.  I was amazed all the different books our library had on animals, books I've never really borrowed before.


Newspaper Math.  This was a huge hit.  We did this twice.  The first time I had the kids cut out what they wanted and the price. Giving us a chance to talk about value.  I also used this opportunity to make a shopping list for what I wanted at the store.  When I did go shopping, the kids were excited to hold my "list" and help me find what I needed.  The second time we looked for numbers and it was fun to have the kids help each other.  If one couldn't find an 8, another would give him one from his page.


Squishy bag Fun.  I was more excited about this then the kids, but it turned out fun.  We put in different colors allowing the kids to mix the colors and knowing whose bag belonged to which kid.  I didn't use duct tape, and my son squished his out of the bag. :(  Live and learn.


Bird Feeders/Bird Watching.  My kids loved, LOVED this.  I didn't have birdseed so instead used cheerios.  My birds (kids) loved eating the treats as we prepared the bird feeders.  We hung them on a tree outside our front window and every time one kid pass the window he/she had to look out for birds.  If one kid looked out the window for birds, they all had to come running.  It was soo exciting when the birds did come and eat our trees.  There was cheers all over the house. :)

Things to know about me.  I really enjoyed sitting down with each child and talking to them all about themselves.  It was funny to hear what they thought my name was, to see the world in the kids eyes.

Sun Scholars

Thanks to the Summer Scholar Families for sharing with us.
We'll see you back next Sunday for more Summer Scholar fun!