Showing posts with label Food. Show all posts

Wednesday, March 28, 2012

Jelly Bean Cake


Looking for a fun and simple treat for Easter?
This Jelly Bean Cake is easy and so much fun!  The kids will love it!

Supplies Needed
- Cake Mix, white or yellow, prepared (one box, or use THIS recipe like I did)
- Food Coloring, various colors
- Cake Frosting (I used THIS recipe)
- Jelly Beans


Directions
1.   Preheat your oven, and grease and flour two baking pans, according to your cake directions.  I didn't have 8" rounds, so I used my 9" square pans instead.


Separate your prepared cake batter into 4 bowls, and tint each bowl to a color of your liking.  

I went a little overboard here.. I was hoping to have more pastels for spring, but dumped in too much.  Oops!


2. Carefully, spoon your batter in alternating spoon-fulls into your prepared baking pans.  You will be laying different colors over top of each other.  I didn't use any rhyme or reason here.  I just dropped batter until my bowls were empty!


3. Bake your cake, according to the cake instructions!  When the cake is ready to come out, the colors won't look as bright on the surface.  Don't worry!  The colors are still nice and bright inside!
Set the cakes aside to cool completely before removing from the pan.


4.  I chose to layer my cake, using frosting in between each layer.  Frost the entire surface of your cake.  Then grab a kid and have them decorate the top with jelly beans.  My 4 year old was more than happy to help with this!
 

Best of all, when you cut into this beautiful cake....


You'll be in for a colorful surprise!

Piece of Cake!

Happy Easter!

Sunday, March 18, 2012

Edible Easter Spring Globe

The Easter Bunny will be here soon!
A friend and I got together to make these fun little Easter treats for the kids.
Simple and unique.  And the kids LOVE them!


Bunny Fronts... or Bunny Behinds!

Months back I came across this adorable idea for a winter version.  I had wanted to do something like this for Christmas SO BAD, but I was having a hard time finding all of the supplies I needed here in China.
 
Edible Snowglobe Place Settings at Suzy's Artsy-Craftsy Sitcom

So with my husband's last business trip to the US, I had him stock up on Easter treats.. and this is what I came up with!  A perfect Easter treat to share with the kiddos in our lives!


Here's the how to... but please know, you can improvise to make this even more simple!!

**FYI**
I had originally hoped to stick some cute little foil-wrapped bunnies inside... not the sugar cookie bunnies I had to whip up in their place.  The downside of having to rely on your husband to shop for your supplies.  He obviously couldn't "see" my vision.  So there is NO REASON you need to go to the trouble to make little bunnies when you can buy some cute alternatives in the Easter isle at the grocery store!


Edible Easter Spring Globes

Supplies Needed
- SOLO Clear Plastic Cups
- Sugar Cookies
- Easter Candies (candy eggs, foil wrapped critters)
- Icing Glue (see recipe below)
- Coconut (I used sweeetened) 
- Frosting (I used a white, Betty Crocker vanilla frosting) 
- Green Food Coloring 

Directions

I use THIS recipe, but any recipe will do.  I roll mine between 1/4" and 1/2", then cut circles using one of the SOLO cups I will use for the "globes".  These are kind of flimsy to use as cookie cutters, so you may opt to find another cup with a similar size.  Let cookies cool completely!


... AND, if you are digging the cookie bunnies, and would rather make these instead of using a foil-wrapped bunny in your globe, here is how I made mine.  (I didn't have a bunny cookie cutter, so I had to improvise!)

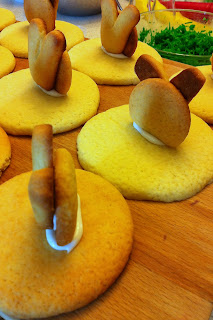
My bunnies were made out of two cookies.  I cut rounds using a shot glass, and sliced off a bit to make a flat bottom, to use as the body.  The second cookie, for the head, I cut rectangles like you see below.
I hand shaped the corners to make a round head at the bottom, and rounded ears on top.


2.  Prepare Icing Glue
I use the same recipe as I would for gluing together my gingerbread houses.  This recipe was enough to complete about 10 globes.

Icing Glue
- 2 cups Powdered Sugar
- 1 Egg White
- 1/4 tsp Cream of Tartar
- Green Food Coloring

Combine the powdered sugar, egg white, and cream of tartar in a bowl and mix well (I use my hand blender).  Add a little bit of green food coloring to get the color you want.  If the mixture is too dry, add a little bit of hot water until you get the right consistency.  If the mixture is too wet, add more powdered sugar.

You want the icing to be thick enough that it will hold it's shape, but not so thick that it is impossible to squeeze from a piping bag!

Transfer your icing to a bag (a ziplock bag will do).


3. Grab the Green Food Coloring!
Put your coconut in a bowl, add green food coloring and mix until you get the color you want.  We spread some of the coconut (after coloring) onto a baking sheet at a low temp (about 250F) for a bit to toast it.  It gave us the darker, crunchy coconut flakes at the bottom of the photo.  I think that in the end, I liked how the moist coconut looked best.

Tint your frosting green as well.  For this project I did not tint my icing glue green, but afterwards I was wishing that I had!


4. Build Your Display
If you are using solid chocolate or foil wrapped bunnies (or chicks), you can use a little icing glue to attach them to the cookie base.  Make sure your cup will fit over top!

If you opted to make your own bunnies, as I did, you will need to "glue" them together.  I used my icing glue to attach the head to the body, as you see in the photos below.  I then "glued" the bunny to the cookie base (again, making sure my cup would still fit over top of each).

Give your these some time to dry so the glue can harden a bit before you move on.


Now... we did a crazy thing.  We mixed a thin glaze frosting, using only icing sugar and milk, and painted over our bunnies.  This is not necessary, and didn't make a huge difference, but you can see the results of doing so in the images below.

 
Once the bunnies are set, frost the base of each cookie around your bunnies using your green tinted frosting (not the icing glue).  Make sure to stay a bit from the edges, so your cup can be attached to the cookie base, and not over top your grass.  

Place some coconut grass over top of the frosting, add a bunny tail (and nose if you wish... I used icing glue for both), and some Easter eggs.  I "glued" all of these on with my icing glue, but you may find that sticking them into the frosting grass is enough.


4. Top it Off!
Snip a small bit off of the corner of your icing glue piping bag.  Run a line of icing glue around the rim of the cup, as in the photo below:
 
Now, as I mentioned above, it would have been better my icing glue was green so this frosting wouldn't be so obvious.

Carefully place the iced cup rim down onto your cookie base and gently press into place.  If you have any wild blades of coconut grass poking out, go ahead and remove those.

To add a nice, finishing touch, I piped a zig-zag around the bottom of each cup.  Not only did this make it look even more snazzy... it hid the white "glue" that I had wished I made green in the first place!

And there you have it!


And here is one happy little girl...


I think these would make great place settings, classroom treats, favors, Easter basket goodies... the list goes on!  I also think that they would be a great activity for the kids.  I'm sure they would love making these.  

I hope you give them a try!!
 

Friday, March 16, 2012

Leprechaun Hat Treats

Happy St. Patrick's Day!
St. Patrick's Day is a very special day in our home.  My husband treat it more as an anniversary than we do our wedding, considering it is the same day that we met.  Quite surprisingly, considering we lived on opposite sides of North America at the time.

So as I was finishing up an Easter project I'll be sharing with you soon, 
THIS idea popped into my head...

A super fun and simple treat to help celebrate St. Patrick's Day!
I will apologize now sharing this at the last possible minute in preparation for the big day...
it really was an after-thought!

I'll also apologize for the lack of photos.  But, it was so simple to make, I hope you don't mind reading the instructions if you even feel they are necessary to create your own.


Leprechaun Hat Treats

Supplies Needed
- SOLO Clear Plastic Cups
- Sugar Cookies
- M&M's, green & brown
- Icing Glue (see recipe below)
- Paper, yellow or gold
- Glue
- Gold Glitter optional

Directions
1. Prepare Sugar Cookies
I use THIS recipe, but any recipe will do.  Add enough green food coloring to get the shade you like. I roll mine between 1/4" and 1/2", then cut circles with a small bowl or large cup.  You want a circle that will be slightly larger than the open mouth of the SOLO cup.

Let cookies cool completely!

2.  Prepare Icing Glue
I use the same recipe as I would for gluing together my gingerbread houses.

Icing Glue
- 2 cups Powdered Sugar
- 1 Egg White
- 1/4 tsp Cream of Tartar
- Green Food Coloring

Combine the powdered sugar, egg white, and cream of tartar in a bowl and mix well (I use my hand blender).  Add a little bit of green food coloring to get the color you want.  If the mixture is too dry, add a little bit of hot water until you get the right consistency.  If the mixture is too wet, add more powdered sugar.

You want the icing to be thick enough that it will hold it's shape, but not so thick that it is impossible to squeeze from a piping bag!

Transfer your icing to a bag (a ziplock bag will do).

3. Fill Your Hat
Fill your cup with green M&M's.  I chose to add brown M&M's at the top of the cup to create the band of the hat.  Fill the cup full, so that the M&M's won't have much wiggle room once the hat is put together.

4. Glue it Together
Snip a small bit off of the corner of your icing glue piping bag.  Run a line of icing glue around the rim of the cup, as in the photo below:
 
Yes.. I know.. work with me here!
This photo is for the next project I will be sharing with you... but same idea applies.
Pretend this cup is full of M&M's and has green icing glue, not white.

With the cup sitting upright on a flat surface (so your M&M's don't fall out) place your cookie on top of the iced cup rim and gently press into place.  You may want to leave your hats upside down like this for several hours, until the icing completely dries... gluing the cup to the cookie.

You will then have this....


5. Add a Buckle
I cut a rectangle out of yellow card stock, cut a smaller rectangle out of the middle, covered it in glue, and poured gold glitter over top.  However, you could even pipe yellow icing directly onto the cup to create your buckle!  When my buckle was dry, I used some of my extra icing glue to attach it to my hat.

And here it is... 

A simple, sweet treat for this St. Patty's Day!
Don't forget your green!


Tuesday, February 28, 2012

Homemade Yogurt

Before moving to China, I would have never known that I could make my own yogurt.  How did I miss this?  Of course, here in China milk is much more expensive to buy than it is back at home (in the US).  For many of you, this will be a great money-saver!  I am not happy with the "runny" yogurt options available here in China, and I wasn't having much luck finding yogurt without added sugar.

So then I found THIS great tutorial by The Frugal Girl
IMG_4359

My directions are NO DIFFERENT.  I'm only sharing my version because I found it difficult to sort through all of the text to understand the process.  Once I got it down, it really is a no-brainer!  What can I say... I'm very visual!!  So here is my attempt to make it super simple for those of you more like me!  PLEASE refer to  The Frugal Girl post if you want more details I'm not sharing here.

I've made this now 4 times, and I have had awesome results EVERY time!

Supplies
- 1 gallon of milk (less fat, less thick your yogurt will be)
- 1 cup of good quality, plain yogurt, unopened
- Air-tight containers (I'm using recycled jars and Tupperware)
- Large, thick-bottomed sauce pan
- Whisk
- Thermometer
- Cooler
- Measuring pitcher (to help you pour into jars)

Directions
1. Make sure your jars or containers are clean and well sterilized.  You will end up with 4 quarts of yogurt (a gallon), so 4 1-quart jars would work perfect.

2. Pour milk into a thick-bottomed sauce pan.  Heat over medium-high heat, while occasionally stirring with a whisk, until you reach 185F-190F (85C-90C).  As you can see, a meat thermometer works just fine.  I used a paperclip to hold it on the side of the pan. ;) 

3. Once at temperature, transfer to a sink with cool water.  Allow the temperature of the milk to drop down to 120F (50C).

4. At 120F (50C), whisk in 1 cup of good-quality yogurt until well blended.  I save a small jar of yogurt from each batch I make to use for this purpose.  If this is your first time, you can use a store-bought yogurt.

5. Transfer some of your yogurt to a pitcher to make it easier to pour into your jars.  I do this in the sink to avoid making a huge mess!

6. Fill your jars or containers.  See those two jars I've set to the side?  They still smelled of spaghetti sauce... ack!  I don't think spaghetti-flavored yogurt would be too popular in our house!  And please.. disregard the mess of milk in the photo.  I over-filled my pitcher making it difficult to pour without the mess.

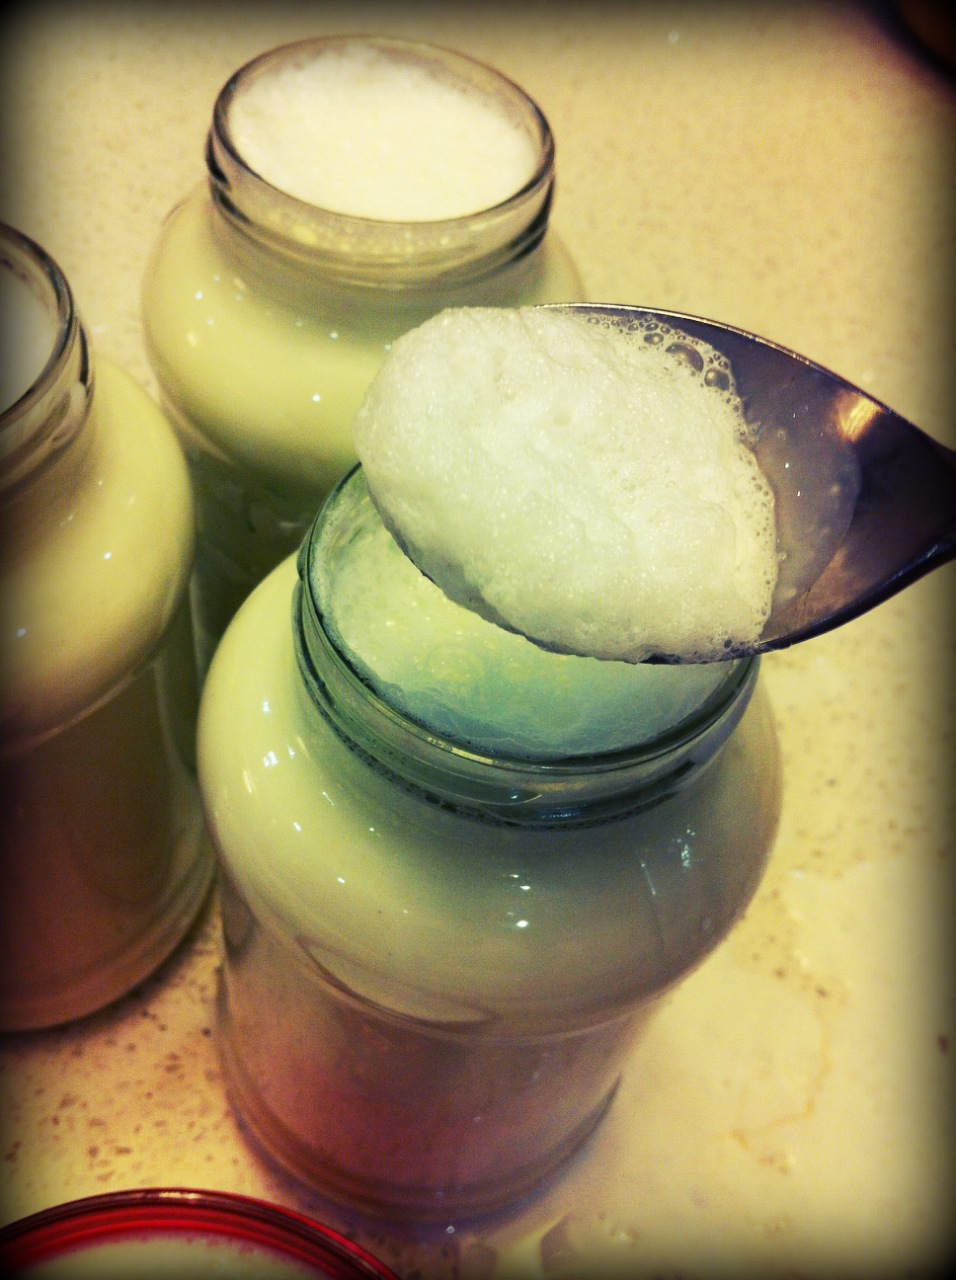
7. Skim the milk froth/bubbles off of the top of each jar/container...

... and your jars will end up looking like this!  Now add the tops and tightly seal.

8. Transfer all of your jars/containers to a cooler that you have filled with a gallon or so of hot water.The Frugal Girl's directions say 120F, but I just use the hottest water I can get from my sink.  I figure that has to be pretty close since it is too hot to put your hands in! Make sure your cooler is in a warm place in your home, away from cool drafts.  

The water only looks murky because some of my jars were sitting in milk.  You may also notice I covered the jars with some plastic wrap before adding the lid... just in case the lids were smelling a little spaghetti saucy!  Because I didn't trust my Tupperware containers would be safe in the water, I was sure to stick something underneath them so they were not submerged.

9. Close the cooler and leave your yogurt there for 3 hours.

10. After 3 hours in the cooler your yogurt will begin to set, but will still be a bit runny.  At this point, transfer it to the fridge.  After a few hours your yogurt will be ready to go!

11. Remember I mentioned saving a small jar of yogurt to use as the "starter" for my next batch?  I make sure to mark it and tuck it in the back of the fridge.

Delicious!!!

The Frugal Girl offers some instructions for making vanilla yogurt on her post, if you are interested in trying that as well.

Now.... Want to know what I'm doing with my yogurt??  I'll have another post to share soon with those details!

Happy Yogurt Making!!!

Sunday, February 26, 2012

Puzzlewich - Feed Your Brain!

I am thrilled to be featuring Shelisa from a great educational (and FUN) blog called Think Magnet!  Her blog is full of creative and simple ways to incorporate learning into the home.  I love how her posts are short and sweet... and many ideas shared can be done with the things you already have on hand.  She also shares some great advice on how to parent learners within your home. Be sure to stop by and see what great things Shelisa is sharing at Think Magnet!

Some of my personal favorites over at Think Magnet...


1) Sweet Spelling                                   2) Snow Day Science
3) Think Boards      4)  If You Give a Dog a Donut Book Club


~*~*~*~*~*~*~*~*~*~*~*~*~*~*~*~*~*~*~*~*~*~*~*~*~*~


FEED YOUR BRAIN!
It's the simple, easy teachable moments that become my favorite. My husband grew up with puzzle sandwiches. I love continuing this tradition.

   
 A food for thought chance to practice spatial reasoning, geometry, problem solving and PATIENCE! Also, buys you some time while you're busy filling drinks, cutting up fruit, or actually sitting down to eat your own lunch. When your child is old enough, have them design and cut a puzzlewich for you!

   
 Apply food puzzling to other foods like pizza, breakfast toast, cheese slices, and tortillas!

 
I also recently broadened our Puzzlewich tradition in creating a Tangramwich! You are what you eat...so what if you eat puzzles.

Happy Puzzle Eating!
Shelisa